Hi All,
Two days ago my copy of "Licence to Fold" arrived, and the first model I had to attempt is Nguyen's Eagle. Unfortunately, I'm having some trouble and was hoping someone could help me.
Up to step 56 I think I'm still all right. In step 57 you crease the diagonal, and it looks as if it indeed touches both corners exactly. But in step 58 (Collapse.) the fold doesn't quite reach the corner. And the collapsed view shows a triangle with an extra strip in the bottom (only one layer of paper).
My problem is that the diagonal indeed reaches the corner (as seen in step 57), and thus when I collapse I don't have that extra strip in the bottom.
I'm a bit confused now. Judging from the diagrams
57 indicates no strip
58 indicates a very narrow strip
59 indicates a not as narrow strip
I'm guessing I must have folded inaccurately (possibly steps 49-51), but am confused about the diagrams.
If someone who has access to the diagrams, and possibly has folded it could help me, it'd be much appreciated.
-- Sara
Nguyen Hung Cuong - Eagle
Forum rules
READ: The Origami Forum Rules & Regulations
READ: The Origami Forum Rules & Regulations
Hi Sara,
I admit I didn't even notice this when I folded it, but you are right it looks somewhat amibguous. I think that in step 57 you are actually extending the crease made back in step 15, which passed through the two highlighted vertices. The centre of this crease is marked as 'beak' in the crease pattern.
I also think that based on the diagrams for steps 59 onwards, it shouldn't meet the corners of the square and so step 56 is a little off.
Hope this helps. Have fun with the rest of the model!
-
StarPartener
- Junior Member
- Posts: 94
- Joined: September 11th, 2008, 7:52 pm
Don't worry about the "extra paper" in the diagrams. The amount of extra paper is related to the pleat you folded in an earlier step around the edge for the wing (I don't have the book with me right now to identify the step).
In the end this extra paper or the exact crease to the corner is not critical because it is not part of the final model. Only part of the crease is used to form the legs.
If you look at the crease pattern you will see the crease you are folding and possibly understand a bit more clearly what I am trying to say.
if you find the license to fold thread, i addressed this question. essentially it doesn't matter if the crease falls exactly on the corners or slightly off, either above or below. the model is based off a 40x40 grid, i believe, but is actually very forgiving, probably because most of us start with such a large sheet. the strip of paper you see at the bottom becomes irrelevant as you shape the wings. so don't worry if you don't have it and the waterbomb base you collapsed is flush, or if the strip appears too big or too small. proceed as directed and you'll see what i mean.
There was a discussion in the Topic that Nicholas Terry opened to talk about Licence to Fold, where he provides a little more info about the Eagle... altho you are ~ 10 steps after the corrections, found around pp. 12 - 14.
viewtopic.php?t=4600&start=180
- Hank Simon
viewtopic.php?t=4600&start=180
- Hank Simon
-
Sara

- Senior Member
- Posts: 285
- Joined: January 25th, 2008, 9:18 am
- Location: Munich, Germany
- Contact:
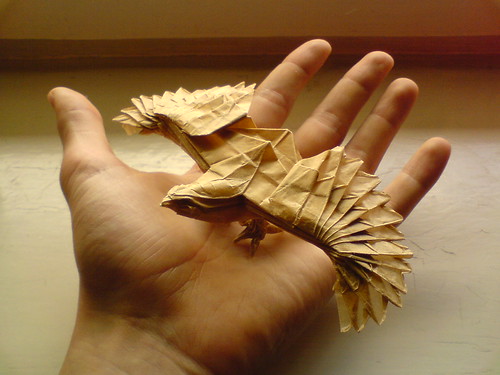
Thank you all for your feedback. I'd been meaning to reply to this with a picture of the finished model, and that's why I've been keeping you waiting for my thanks.
Unfortunately, I've somewhat given up on the model for now. I tried folding it once more, after I read your replies, and stopped even earlier - I wasn't working accurately enough.
And since then I've just been too busy (and I guess to frustrated with the model) to attempt it again. However, I did pencil in some remarks, so the next time I attempt the model your advice will be waiting there for me. [I also corrected the error in the diagrams at step 43-44.]
-- Sara

hello people im having trouble with step 58 when collapsing  i dont really understand what to do!! any help would be apreciated
that thing in the top indicates a sink action? also i dont know if there are any folds in the back layer, that's very confusing
that thing in the top indicates a sink action? also i dont know if there are any folds in the back layer, that's very confusing
Last edited by federicoh on February 9th, 2011, 12:20 am, edited 1 time in total.
-
Sara
- Senior Member
- Posts: 285
- Joined: January 25th, 2008, 9:18 am
- Location: Munich, Germany
- Contact:
You should have the same folds on the other side. So when collapsing, go along those creases on the back, too.
The diagrams indicate a sink action in the top (correct), and also indicate three up arrows that indicate how to best perform the collapse. Move a upwards, and fold pleats along the the grid on the left and right. The same holds for the back, of course.
Having said this, I spend a long time on this collapse step. I found out some of my creases were incorrect (the triangle indicated by b and a) on one side, then inserted the wrong ones on the correct side, until I figured out that the other side was incorrect. So if collapsing isn't working for you, check that all the creases are in place.
-- Sara
i was fine with the creases and figured out this collapsing 
im having lots of trouble in this eagle, get complicated now on step 61, i hate this non comented diagrams. i go fine with the top layer you squash to the left, but get a lot of trouble with the part underneath
im having lots of trouble in this eagle, get complicated now on step 61, i hate this non comented diagrams. i go fine with the top layer you squash to the left, but get a lot of trouble with the part underneath
Last edited by federicoh on February 9th, 2011, 12:20 am, edited 1 time in total.
im needing some help plz this is step 70-71 finished! i dont know if this layer is right, because the model doesn't lie flat... i know the book says that but i wana be sure if its ok


Last edited by federicoh on February 9th, 2011, 12:21 am, edited 1 time in total.
i dont remember what a bird base is :$ jeje... im not undestanding you in deep... so you're saying that it has to be asimetrical.. but where? may i squash that part? or im missing a crease? also im now seeing that another layer also is giving me problems... ill post some pictures
SIDE VIEW - here you can see both horizontal layers, the top one was creased to a side by the lines seen... the other i dont really know

TOP VIEW

someone told me that some steps in the diagram where not ok... i made them as the diagram says would it give me lots of problems?
SIDE VIEW - here you can see both horizontal layers, the top one was creased to a side by the lines seen... the other i dont really know
TOP VIEW
someone told me that some steps in the diagram where not ok... i made them as the diagram says
Last edited by federicoh on February 9th, 2011, 12:21 am, edited 1 time in total.
-
PauliusOrigami

- Forum Sensei
- Posts: 781
- Joined: July 15th, 2009, 9:30 pm
- Location: Lithuania, Vilnius
- Contact: